TRS menu and HUD editor
The TRS menu
Open it with Right Shift. On the left is the rail:
| Entry | What it does |
|---|---|
| All and the categories | Module tiles: HUD, PvP, Chat, World, Redstone, FPS (performance) and Other |
| HUD Editor | Move and resize HUD elements |
| Profiles | HUD profiles and server profiles |
| Presets | Ready-made module packs |
| Notes | Your notes for this world |
| Packs | Resource packs |
| Accounts, Wardrobe, Social, Clips | The matching screens |
| Report bug | Send a bug report to the TRS team |
The search box at the top finds modules by name – Esc clears it. Entries that the running Minecraft version doesn't support are hidden.
Turn modules on and off
Find the module
Pick a category or type its name into the search box.
Flip the switch
The small switch at the top right of a tile turns the module on or off. Tiles that are on glow in your accent colour.
Open the settings
Click the tile itself to open its settings. A gear on the tile means it has settings. Every settings page has Reset, and HUD modules also get Show in HUD editor.
Settings can be switches, sliders, drop-down lists, key fields (click, then press a key) and colour pickers with opacity and Chroma (a colour that cycles through the rainbow).
HUD editor
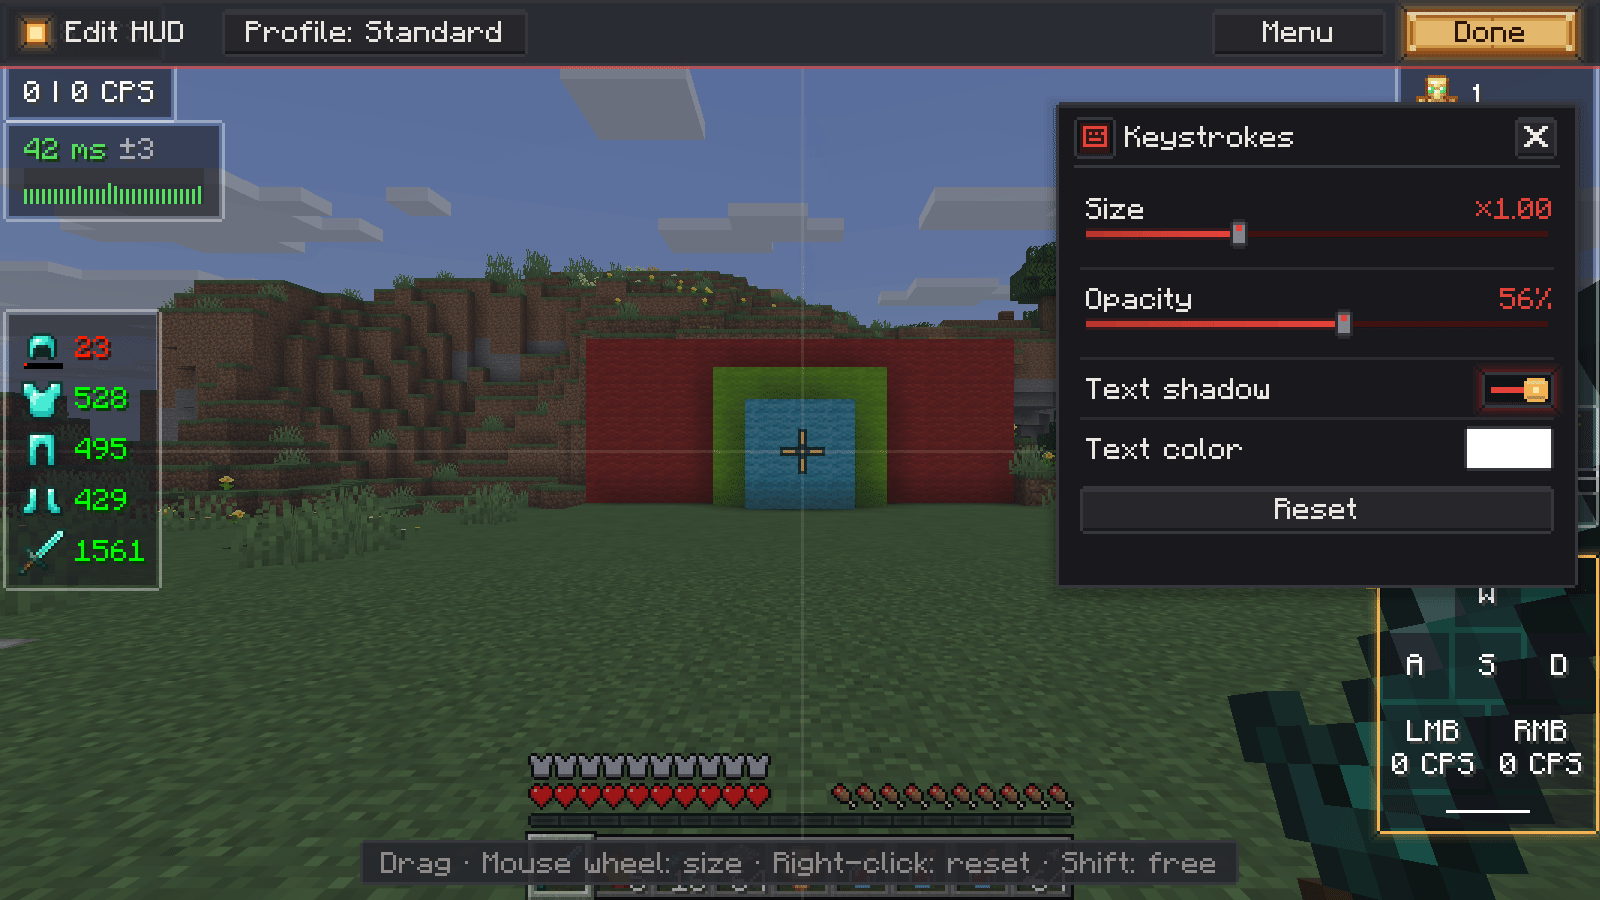
Open it from the rail (HUD Editor) or with Show in HUD editor on a module page.
- Drag an element to move it. It snaps to the screen edges, the centre and other elements, with guide lines.
- Hold Shift while dragging to place it freely.
- Mouse wheel over an element changes its size.
- Right-click resets its position.
- Click an element to open its panel: Text color, Text shadow, Background, Opacity and Size.
HUD elements
| Module | Shows | On by default |
|---|---|---|
| FPS | Frames per second | yes |
| CPS | Clicks per second (left | right) | yes |
| Keystrokes | WASD, mouse buttons and space bar | yes |
| Ping | Round-trip time to the server | yes |
| Armor | Worn armour with durability, vertical or horizontal | no |
| Potion Effects | Active effects with remaining time | no |
| Coordinates | Position, facing direction and biome | no |
| Clock | Your computer's time (optionally seconds or 12-hour format) | no |
| Memory | RAM used by the game | no |
| Server Address | Address of the current server | no |
| Active Resource Packs | The enabled resource packs | no |
More HUD elements come from other modules: minimap, redstone tools, PvP displays, warnings, item counter, clip status and the pinned note.
HUD profiles
A profile saves the position and look of all HUD modules and the performance settings. Use one for PvP and one for building, for example.
Open Profiles
TRS menu → Profiles → tab HUD profiles.
Create a profile
Click New profile and give it a name (up to 24 characters). You can have up to 16 profiles.
Switch
Click a profile to switch to it, or bind the key Switch HUD profile in the Minecraft controls (unbound by default).
Server profiles – setups that switch automatically on a server – are explained under Chat and comfort.
Presets (module packs)
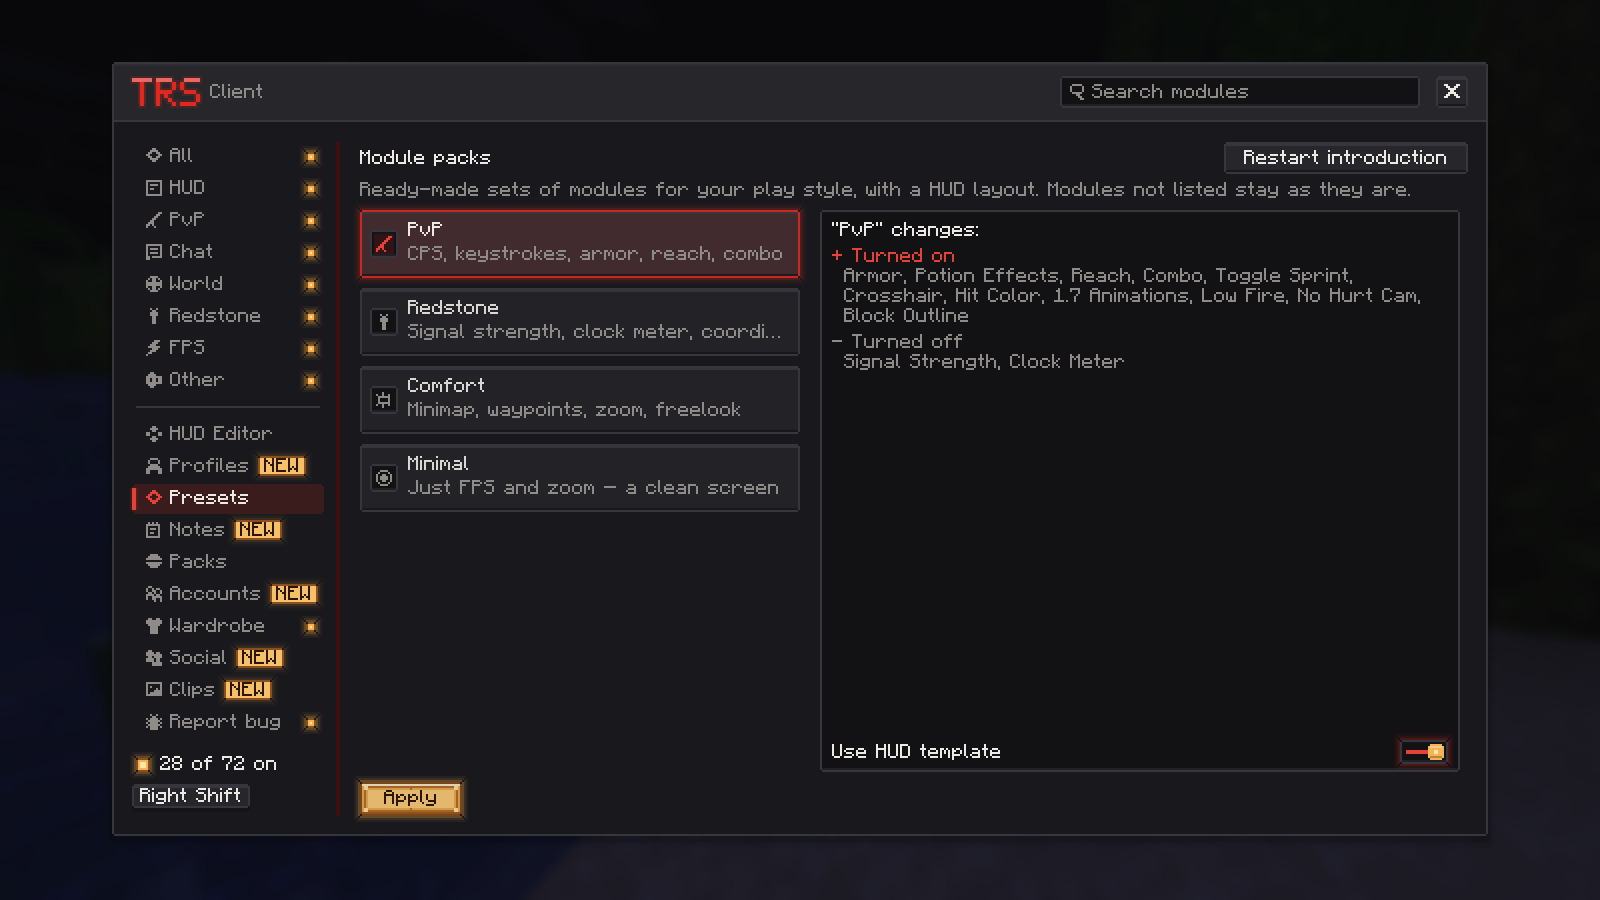
A module pack sets up the client for a play style with one click:
| Pack | Turns on |
|---|---|
| PvP | FPS, CPS, ping, keystrokes, armour, effects, reach, combo, toggle sprint, crosshair, hit colour, 1.7 animations, low fire, no hurt cam, block outline |
| Redstone | FPS, coordinates, clock, signal strength, clock meter, zoom, freelook, waypoints, block outline, effects |
| Comfort | FPS, coordinates, clock, minimap, waypoints, armour, effects, toggle sprint, zoom, freelook, chat improvements |
| Minimal | Only FPS and zoom – everything else in the HUD off |
Pick a pack to see what will be turned on, turned off and moved. Use HUD template also moves the HUD elements. Apply sets it up, Undo brings back what you had. Modules a pack doesn't name stay as they are.
Menu style
The module Menu Style gives Minecraft's own screens the redstone look: redstone background, stone buttons that light up, server cards with redstone ping bars. Every button keeps working – also those added by other mods.
You can switch each part back to the classic look:
- Pause menu and TRS buttons in the pause menu (Wardrobe, Accounts, Clips, Social, Server info)
- Server list – pin servers to keep them on top and see which TRS friends play there. "Direct Connection" and "Add Server" are restyled too.
- Loading screens
- Options
- World list
- Error screens (connection lost, kicked) – see Chat and comfort
The pause menu button Server info shows world or server name, address, version, players, dimension, position and the TRS friends on the same server, with Copy address.
Title screen
The module Title Screen replaces the vanilla title screen: your own skin stands on a redstone turntable (drag it to spin it), with Wardrobe below and a bar on the right for Accounts, Social, Clips & Images and the TRS settings. Animated background turns the moving redstone circuit on or off. Classic title screen opens the vanilla one once.
Settings sync
With the TRS services on, your modules and their settings, HUD profiles and TRS keys are saved with your Minecraft account – set up the client once and it looks the same on your next PC. Waypoints, server lists, server profiles and Minecraft's own options stay on each PC.
To turn sync off, open TRS Online Features in the TRS menu and switch off Sync with TRS account. The same page shows the sync status and a Sync now button.
What is the TRS Client?
The TRS Client is the free client mod of the TRS Launcher for Minecraft 1.7.10 to 26.3 on Fabric, Forge and NeoForge. How it gets into your game.
Performance and FPS
More FPS with the TRS Client – FPS Boost levels, performance check, frame limit, Dynamic FPS, entity culling, particles and built-in optimizations.